How to setup an Nginx reverse proxy with a SSL certificate in XWIKI
Hey everyone, Tonight I continue my previous post of the complete setup of xwiki. This post is about how to setup Nginx as a reverse proxy with an SSL certificate.
Before moving further we consider that xwiki runs on the server( EC2 server) with a domain name called example.in
To create a custom domain name using AWS you can follow this link:- https://aws.amazon.com/getting-started/hands-on/get-a-domain/
By default, Tomcat 9 works on port 8080, and you can only visit your XWiki site from the same port. If you want to facilitate visitors' access by removing the port number part, you can install Nginx as a reverse proxy between XWiki and visitors.sudo apt install nginx -y
Step 2, Setup Nginx as a reverse proxy by modifying its default site configurations:cd /etc/nginx/sites-available
sudo mv default default.bak
sudo vi default
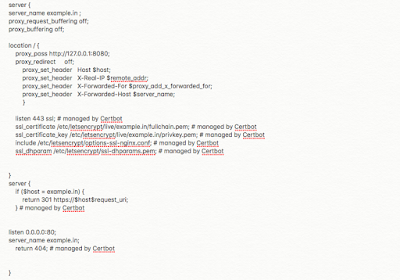
server { Step 3, Edit the file
listen 0.0.0.0:80;
proxy_request_buffering off;
proxy_buffering off;
location / {
proxy_pass http://127.0.0.1:8080;
proxy_redirect off;
proxy_set_header Host $host;
proxy_set_header X-Real-IP $remote_addr;
proxy_set_header X-Forwarded-For $proxy_add_x_forwarded_for;
proxy_set_header X-Forwarded-Host $server_name;
}
}
Save and quit
Step 4, Start the Nginx service and set it to automatically start on system startup:sudo systemctl restart nginx.service
sudo systemctl enable nginx.service
sudo ufw deny 8080
sudo ufw reload
Step 6, Verify
So just check the port number 80 is working or not on the browser
example.in:80
Also, check port number 8080 is not working
example.in:8080
Step 7, Add SSL certificate
First, download the Let’s Encrypt client, certbot:apt-get update
sudo apt-get install certbot
apt-get install python-certbot-nginx
Step 8, Obtain the SSL/TLS Certificate
The NGINX plug‑in for certbot takes care of reconfiguring NGINX and reloading its configuration whenever necessary.- Run the following command to generate certificates with the NGINX plug‑in: sudo certbot --nginx -d example.in -d example.in
- Respond to prompts from certbot to configure your HTTPS settings, which involves entering your email address and agreeing to the Let’s Encrypt terms of service.
- certbot generates a message indicating that certificate generation was successful and specifying the location of the certificate on your server. When certificate generation completes, NGINX reloads with the new settings.
- If you look at domain‑name.conf, you see that certbot has modified it:
Now check the URL https://example.in
Hope you enjoyed my blog post.😎


Comments
Post a Comment
Please give us your valuable feedback